Our Blog
2 Easy Ways To Create A WordPress Staging Site
WordPress has made it easy for all kinds of users to acquire a website. The platform gives them complete control over every aspect of their interfaces. They can make the desired changes by using the intuitive admin dashboard of the CMS. Most of the modifications do not require any coding input. People can add new features to their interfaces by installing the relevant plugins. However, these changes do need to be tested before they are made live to avoid any kind of issues. The best way is to create a WordPress staging site where all the alterations are examined before their deployment. The following two methods can be used for building a staging environment for WordPress websites.
What Are Staging Sites?
In simple language, a staging site is a cloned version of your live interface. It provides you with a secure environment for testing new features or any other changes. These sites are helpful in spotting errors which would have otherwise ruined your live website. Developers use such environments to experiment and test new ideas or products. Many people create a WordPress installation locally on their systems. They do all the testing locally and then switch the changes from the localhost to their live server. However, there is no guarantee that anything which worked in the local environment will surely work on the live server. Staging sites are located on the host server and, therefore testing on such interfaces will always be more efficient.
How To Create Staging Setup For WordPress?
There are various ways of building a staging setup for WordPress. In this article, we are presenting two methods which will suit all types of users.
1. Creating A Staging Site Through Website Hosting Service
The simplest way to build a staging platform is through a website hosting service. Most hosting firms provide the facility for creating the environment easily in a single click. The newly-generated test interface will be on the internet but it will not be available to visitors or search engines. Let’s see how you can conduct the process by using your hosting service. Please remember that each company has a different user interface and the process will depend on your service provider.
i. Access Your Hosting Account
We will demonstrate the procedure by creating the site for an interface hosted on SiteGround. It is one of the top WordPress hosting agencies and offers the staging feature in some of its plans. Access the cPanel of your hosting account. Scroll down to locate the section called WordPress Tools. Here you will find an option called Staging. Click on it and move to the next step.

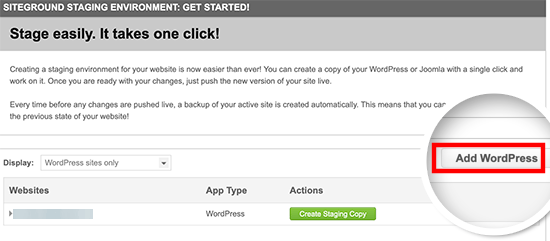
ii. Create The Site
You will be directed to a new page. Hit the Add WordPress button to start the process to create a WordPress staging site.
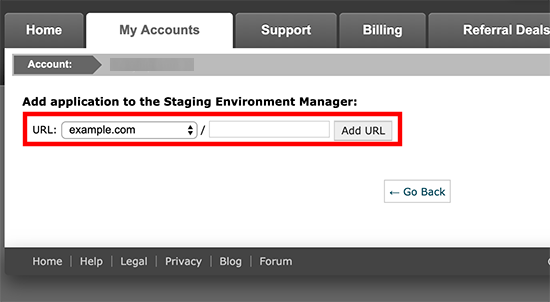
On the next page, you will be asked to enter the URL where your interface is installed. Provide the detail and press the Add URL button.
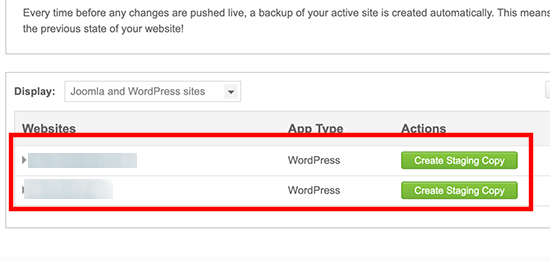
The manager tool will detect your interface and display it on the page. A green-color button with the message Create Staging Copy will be visible against the URL.
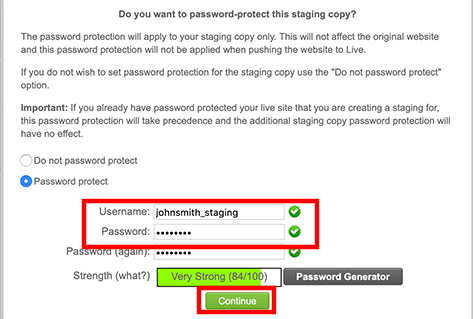
When you hit it, a pop-up asking to password protect your site will appear. Enter your username and password and then click Continue. Your site will be generated and links to its admin section will be displayed.
iii. Deploying Changes To Live Website
Deploying the changes made in a test environment to a live website can be easily done in SiteGround. Go back to your cPanel and hit the Manage Staging Copies tab against your website. This will take you to a new screen. Here you need to press the Push To LIve button. This will make all the modifications functional on the actual interface.

2. Creating A Staging Set-up Through Plugin
WordPress custom plugin development has provided users with a wide range of handy tools for adding all sorts of functions. We will now build the site using one such handy tool.
i. Install And Activate A Plugin
There are various plugins that help in generating a staging environment. However, you must keep in mind that these tools have limited control on hosting servers. In this tutorial, we will be using the WP Stagecoach plugin. Log in to the admin dashboard of your interface’s installation. Select Plugins in the menu and go to Add New. Search for the WP Stagecoach plugin by typing its name in the field. Locate the correct option in the results and download it. Activate the solution on your website and move to the next step.
ii. Configure The Settings
Click on the WP Stagecoach option in your dashboard menu. This will open the settings page. You will be asked to provide a username and an API Key. The code can be generated by accessing your account on the plugin’s website.

You will now be asked to enter a name for your test site. Tick the box against the Password protect the staging site option. Hit the Ride The Stagecoach tab.

The tool will now generate your staging environment.
iii. Moving The Changes To The Live Environment
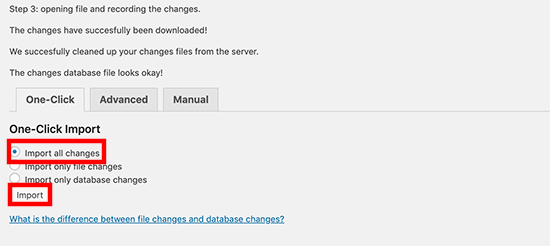
Go to the dashboard and click WP Stagecoach and choose the Import Changes option. Hit the check for changes tab. After evaluating the changes, the tool will display the options for importing them. Turn on the Import file changes radio button and hit import. All your alterations will be shifted to the live website.
Conclusion
WordPress web development has made it convenient for people to acquire interfaces. However, managing them requires some additional infrastructure. The process discussed here will help in generating a staging platform for testing all the changes before applying them in an actual user environment.