Our Blog
3 Simple Steps To Add WordPress Website To Google Search Console

Have you just started a new website and looking to optimize it for search engines? Then this post is meant for you. Obtaining better search results rankings is every webmaster’s ambition but only a few realize this goal. Here we are discussing how to add WordPress website to Google Search Console. Google is the world’s most popular search engine cornering over 90% of the market share. Once you achieve better positions in Google SERPs, you automatically start to realize your digital marketing goals. Integrating your interface with the Search Console service is a key step in this direction. It gives you access to various kinds of data related to your website. You get to get a comprehensive view of how the search engine giant actually sees your website. This insight can help you in making improvements to boost your online presence.
What Is Google Search Console?
The Google Search Console is a free service offered by the search engine market leader. It was earlier known as Google Webmaster Tools and got its present name in 2015. The tool lets you monitor your interface and identify any issues affecting it. You can use it to know whether the search engine is easily crawling or not. It can also be helpful in spotting any indexing problems. You can use the service to request the indexing of fresh or updated content. Webmasters can access valuable search traffic information related to their interface. They can know about the frequency of search appearances of their website and the terms which triggered its appearance. You can also configure the settings to receive alerts when the service spots spamming or any other problem on your interface. The tool is a valuable accessory in resolving issues related to any search feature. In brief, Google Search Console is a handy tool to ensure the good health of your website.
How To Add A WordPress Website To Google Search Console?
Whether you converted website to WordPress theme or acquired a new interface, connecting it to the service must be your top priority. The following steps will help you in adding your website to the beneficial webmaster tool.
1. Create A Free Account With The Service
A majority of people will not need to perform this step as they will be already possessing a Google account. You can use your existing Google profile to activate your account on the Search Console. In case, you do not have a Google account, you can easily create one by visiting the Google Search Console website. You only need to provide your name and some other personal details apart from choosing a username and password. Once your profile on the service has been created you can initiate the process to add WordPress website to Google Search Console.
2. Provide Your Website’s URL
The process of integrating your website with the webmaster tool starts with the user providing her website’s URL. Once you are logged in to the Search Console, click on the hamburger menu (three horizontal lines), in the top left-hand corner. You will now see an option called Add property along with a dropdown menu. Click on the arrow to expand the dropdown. You can now enter your interface’s URL.

Remember to provide your domain in full. Let’s say your website’s address is “https://yoursite.com/”. Then you have to include “https” at the beginning and the “/” at the end. Moreover, if “www” is a part of your URL, then it must also be mentioned here. Make sure you know your exact URL before entering it in the specified space.
3. Verify Your Website Ownership
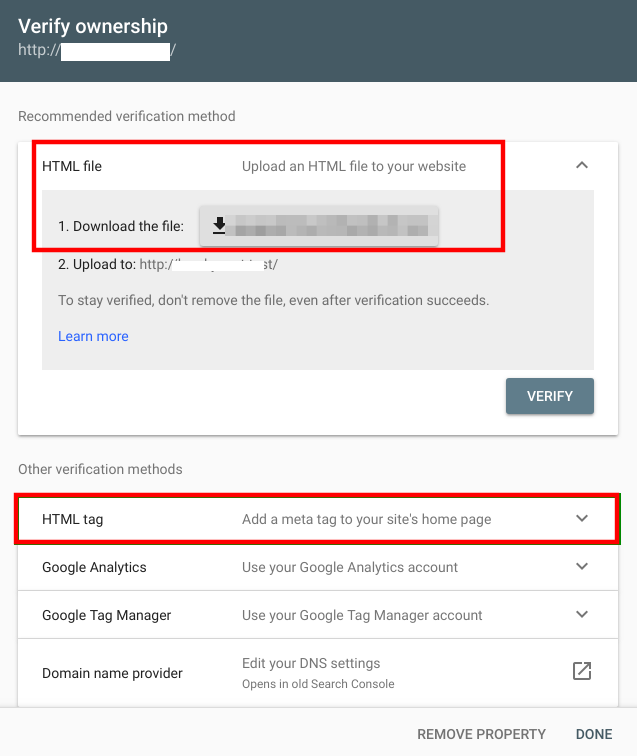
The service will now want to ascertain that you are actually the website’s real owner. Once you enter the URL, you will be directed to another screen for ownership verification of the said domain. There are various methods to verify the website ownership. You can download an HTML file and then upload it to your website’s root folder through FTP.
However, there is an easier alternative. For this, you must first install the Yoast SEO plugin. It is a handy tool which helps in optimizing a website for search engines. It contains some helpful features, one of which you will now see. Go to Plugins > Add New in the dashboard and search for the plugin. Install and activate it on your website.

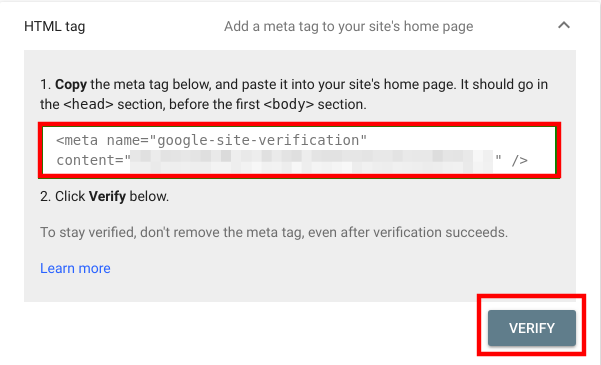
Go back to the Search Console and scroll down to other verification methods. Click on the HTML tag dropdown and copy the authorization code.
Go to your WordPress dashboard and locate SEO in the menu and then click on General. Now click on the Webmaster Tools tab. Here you will see a field called Google verification code. Paste the code in this space and hit the Save Changes button.
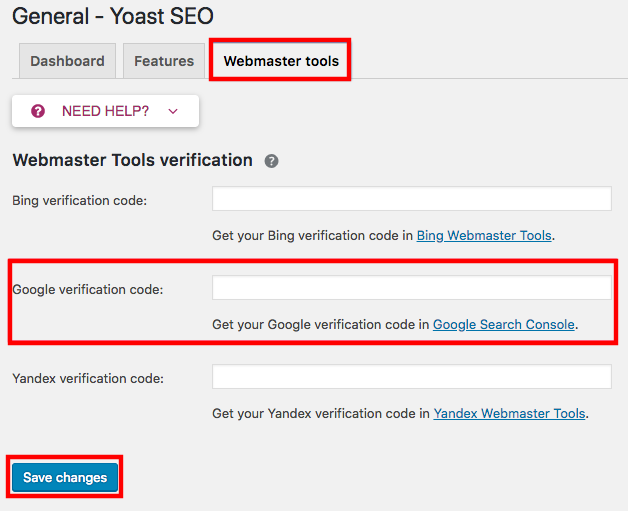
Now switch to the Google Search Console and hit the Verify button. Your website is now connected to Google’s useful service.
Conclusion
Connecting your website with Google Search Console is just the first step. You will now have to understand the information provided by the service and make modifications to your website accordingly. In case, you face some problems in undertaking the changes, you can contact a professional WordPress website development firm for help by calling us at +1.415.548.6170 or filling our request-quote form.