Our Blog
3 Ways To Redirect WordPress Attachment Pages To Original Post
We all like to add images to enhance the visual appeal of our websites. However, adding pictures without planning can cause issues on your interface. You must be thinking that here comes another blog talking about the importance of image optimization. It is correct that all photos and other media must be resized and properly optimized before being uploaded on the website. However, we are not discussing the practice this time. Here we are describing some simple ways to redirect WordPress attachment pages to original post URLs.
Most of you will be unaware that every time an item is added to your website’s Media Library, the CMS creates a separate attachment page for the file. This page includes the related media and has a URL that has been generated automatically. Imagine the number of such URLs existing on your interface and their effect on the website. Some of you will be wondering why is it necessary to set up such redirects. Let’s say you upload a post with a couple of images. Now, three links will be generated for the two images and the post. This is not an ideal scenario for SEO. There can be instances when an attachment link starts getting more traffic than the post URL. People arriving at the location will find content that does not seem useful and this will result in a high bounce rate. In order to avoid such situations, it is essential to point the links towards the original location. Let’s see how these links can be redirected to their parent URLs.
1. Modifying The image.php File
WordPress uses a special post type called attachment to store information about files uploaded to Media Library. All the relevant information like name and description are included in these post types. In the case of images, the attachment post type will contain details like the file size, location, the related HTML alt text, generated thumbnails, and other relevant data. Template files are used to serve these attachments depending on their mime-type. All files that have the post_mime_type of image/*will be displayed through the image.php file of your theme.
Here we will modify the image.php file of your website to set up the redirects. In order to locate the file, you must first use an FTP client to connect to your website. Once you have established the connection, you can locate this file inside your activated theme’s folder.
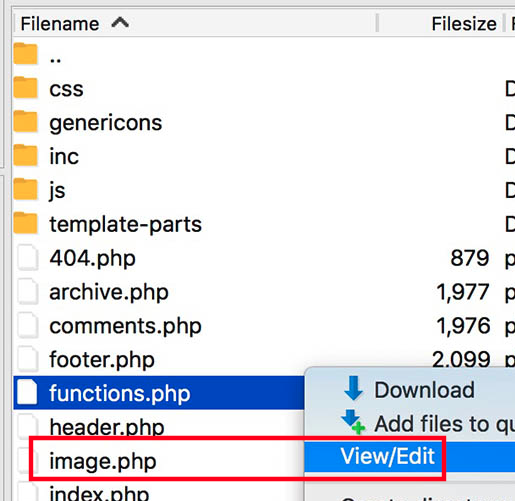
You will have to add a single line of code to the top of the image.php file. Click on the file and select the Edit option and then add the following code on top:
<?php wp_redirect(get_permalink($post->post_parent)) ; ?>
Save the file and upload it to complete the process to redirect WordPress attachment pages to original post locations.
2. Through A Custom Function
A theme is a pre-built structure on which your interface is based. It does not matter whether you migrate from another format or acquire a new interface, you will need to use a theme. For instance, people have to convert HTML website to WordPress theme. Many people choose readymade templates instead of fashioning a custom one for their projects. However, when a theme update is installed the custom changes made to the layout can be lost. Child themes allow users to retain the modifications even after the installation of upgrades. A child theme contains all the styling, features, and functionality of the parent product. Since all the changes are saved in it, any updates to the parent do not affect your website. You can add a custom function with redirect code to the functions.php file of your child theme to point attachment pages to original links. Connect through an FTP client to your website and locate the child theme folder.
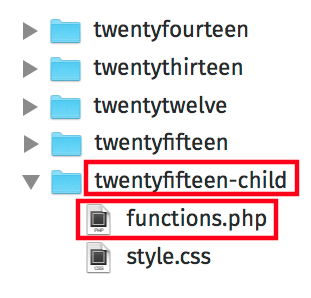
Find the functions.php file inside the folder and open it in an editor. Now copy the code shown below and paste it at the end of the functions.php file.
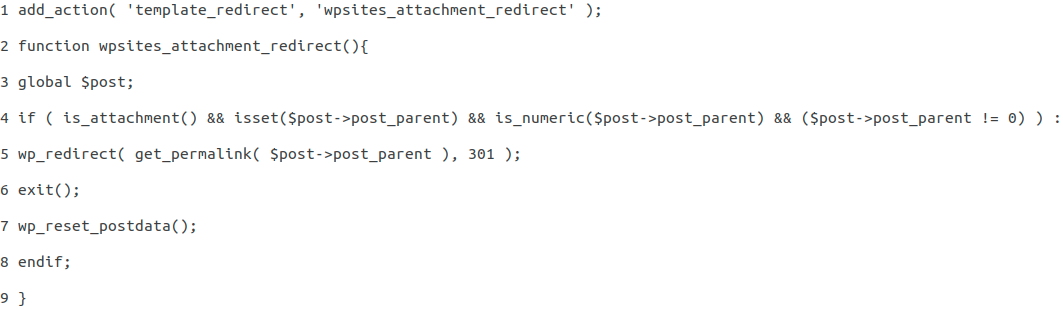
Save and upload the file to set up the redirects.
3. Through The Yoast SEO Plugin
The two methods discussed until now can seem too technical for beginners. Accessing the code of your website and modifying key files will be a bit risky if you do not possess enough technical knowledge. However, there is another simpler way for you to achieve the same objective. You must be using SEO plugins on your website and most of them have settings features that can be used to create redirects. We will show you how to set up the redirects by tweaking the settings of the Yoast SEO plugin.
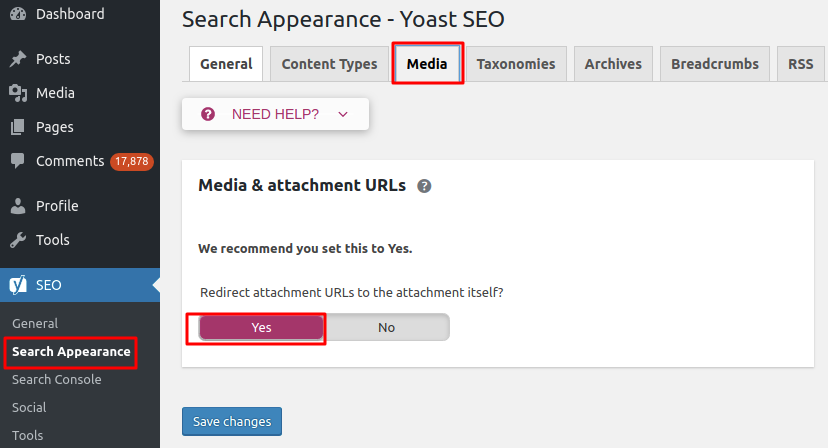
Access your website’s control panel and locate the SEO option with the Yoast icon. Now click on the Search Appearance option under SEO in the left-hand menu panel. Select the Media tab and go to the Media & attachment URLs section. Locate the option called Redirect Attachment URLs to the attachment itself and press the Yes button below it. Press the Save changes tab and now all the attachment pages will be redirected to their parent links.
Conclusion
These are some simple ways to redirect attachment pages to their original posts so that no SEO issues are created on your website. You can also hire a professional WordPress web development company to do the job in an even more effortless manner.