Our Blog
How To Change WordPress Theme Styling With Chrome DevTools
WordPress has revolutionized the world of web development by empowering even technically deficient people to build a website. A person has to simply pick and choose the various elements to construct an interface. It is possible to create a fully-functional website without writing even a single line of code. This is truly a huge convenience for all kinds of users. However, there are situations when programming skills are required. Even in such instances, people do not need too much technical knowledge to do the needful. One such task is to change WordPress theme styling. There are many users who want to alter the appearance of their interface but think that it is a deeply technical process. In this article, we are showing a simple method to make basic changes to a theme with the help of Google Chrome’s DevTools.
What Is CSS?
In order to modify the appearance of a theme, we will have to make changes to its CSS file. Cascading Style Sheets or CSS as it is popularly called defines how a document will be displayed on any media. A document is generally a text file structured with a markup language like HTML. In WordPress, CSS controls how HTML elements will be presented in a browser. Users can specify selectors which are HTML items and then apply properties to them. Style sheets make life easier for developers by allowing them to control the appearance of multiple web pages at once. We will explain how CSS works with the help of an example. Take a look at the following HTML program.

In this code, there is a header and a paragraph element. The stylesheet has been applied to the program through the element. Now, look at the following CSS code.
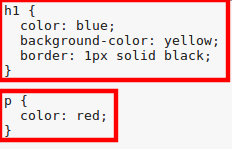
There are two rules in this code. The first begins with an h1 selector and defines that the color of the text will be blue. It also sets the background color as yellow besides defining a sold 1-pixel wide border in black color. The second rule begins with the<p> selector and only sets the text color as red. The code will help generate the following output in a browser:

It will now be clear to you how CSS is used to control the appearance of HTML elements in WordPress.
How To Modify The Styling Of A WordPress Theme?
It is now time to learn how to change WordPress theme styling. We will show the method to make basic alterations to the styling in a browser. Many people convert HTML to WordPress theme or shift from other platforms. The following process will help such users make simple styling changes easily.
1. Open DevTools In Chrome Browser
Do you know that you can make simple modifications easily through your browser? Both Google’s Chrome and Apple’s Safari have in-built tools that can be used for this purpose. In this article, we will be displaying how to do the process with Chrome’s tools. Google has provided a few web development tools which can be accessed in its browser. These solutions are called DevTools and are helpful in spotting issues as well as making quick changes. You can open DevTools either by using the keyboard shortcut “CTRL + Shift + I” or by right-clicking on a page and selecting the Inspect option.
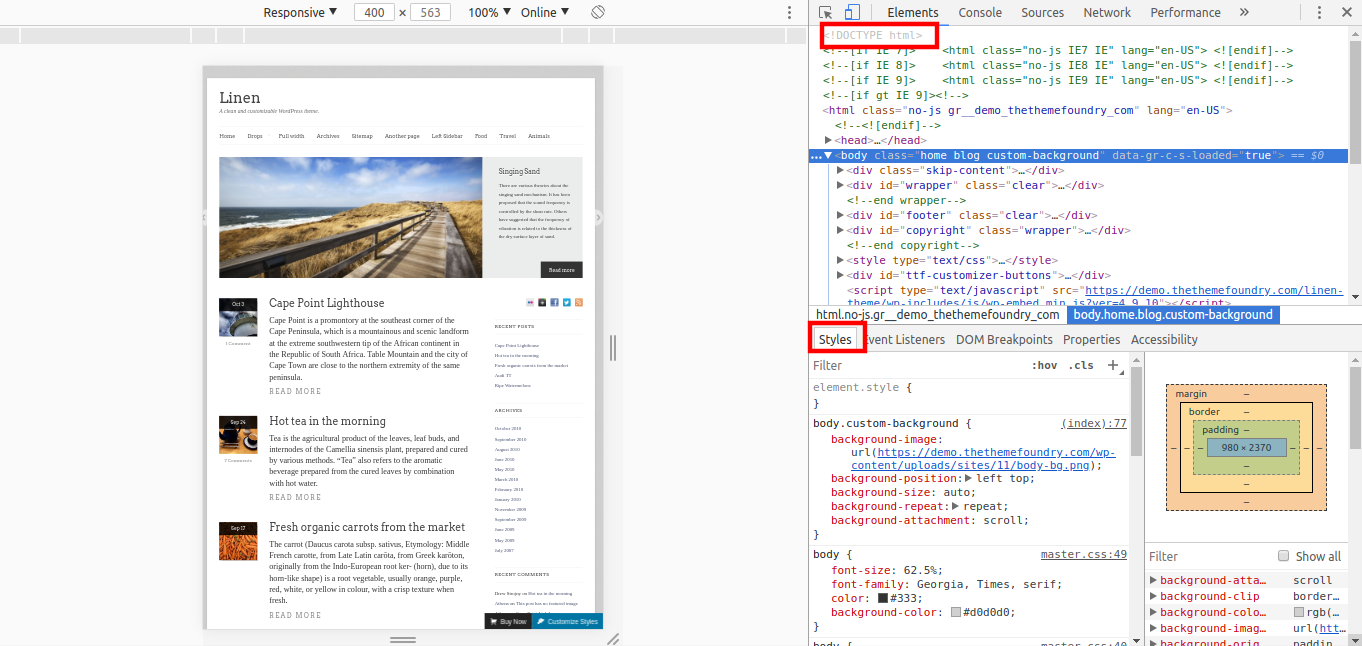
Take a look at the above image. We have opened a theme’s demo page in the Chrome browser and then activated the Inspect tool. The screen is divided into two parts and the section on the right-hand side is further horizontally divided into two more parts. All the styling code is in the bottom section while the HTML is displayed in the above.
2. Select The Element You Want To Modify
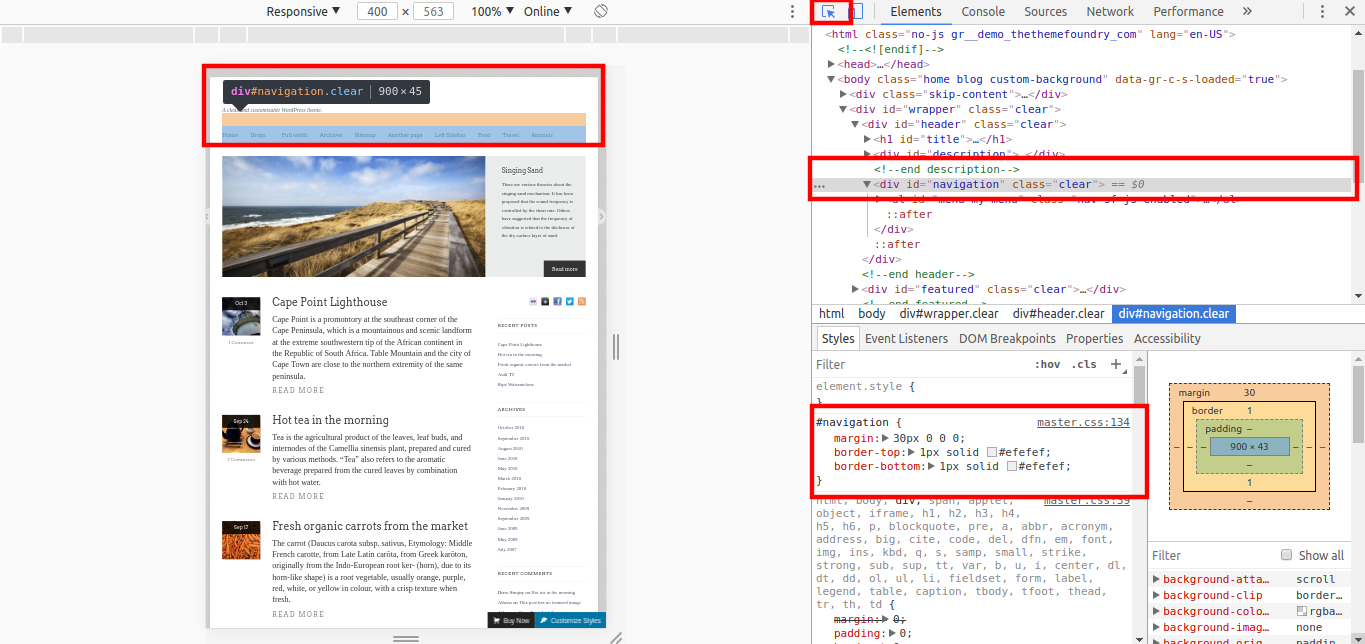
We will now show you how to select the area where you want to make the modifications. Go to the topmost part of the right-hand section. The first icon which shows a cursor arrow in a box will help you make the selections. Click on this icon and then hover your cursor over the page displayed in the left section. In the example image, we have chosen the navigation element. When we clicked on it, the corresponding line in the HTML was highlighted and the styling directions became visible in the CSS section.
3. Make The Desired Changes
Take a look at the code in the CSS section which we highlighted in the above step. Each line shows a property and the value assigned to it. The selector is #navigation indicating where the style must be applied.
#navigation {
margin: 30px 0 0 0;
border-top: 1px solid hsl(0, 0%, 94%);
border-bottom: 1px solid #efefef;
}
We will try to change the color of the border. Refer to the third line of the code in the Inspect tool. You will notice a small square box. This is the color picker. Click on it to open it and choose your desired color. You can see the modifications in real time. Copy the values of the properties you have changed and move to the next step.

4. Confirm The Changes
DevTools lets you see how a modification will look on a page but it cannot apply the changes permanently. In order to confirm the modifications, you will have to modify your style.css file. You can access the file through the admin dashboard of your installation. Log in to your website’s control panel and go to Appearance and then select Editor. Search the styling code in the editor and apply the values you copied in the previous step. Click the Update File button at the bottom of the page to complete the process.

Conclusion
This is a simple method to make basic modifications. It will be sensible to hire a professional WordPress web development agency to make complicated changes.