Our Blog
A Complete Guide To Set up Google AMP On WordPress Websites
It is expected that by the end of 2019 about 63% of users will access the internet through mobile devices. Mobile e-commerce sales can amount to $2.32 trillion by 2021. These couple of statistics demonstrate how internet traffic and commerce is going to be driven largely by smart devices. Website owners, therefore, have to make sure that their interfaces load quickly and properly on mobile gadgets. Enabling Google Accelerated Mobile Pages can be helpful in this regard to WordPress users. In this article, we will discuss how to set up Google AMP on WordPress websites. We will also list down the advantages and drawbacks of using the technique. Let’s now dive into the topic
What is Google AMP?
Google’s Accelerated Mobile Pages (AMP) is an open source project for creating web pages that load instantaneously on smart devices. The main objective of the initiative, which began in 2016, is to enable fast-loading web content for mobile users. AMP’s web component framework uses minimal HTML and JavaScript. This helps in creating stripped-down versions of existing pages without reducing their visual appeal. This ensures that pages crafted specifically for handheld gadgets load quickly in mobile browsers.
What Are The Benefits Of Google AMP?
There are various benefits of using AMP for website owners. Let’s take a look at them.
1. Better User Experience
A major advantage of using the open-source project is a better user experience on the website. Pages that have been generated specifically for mobile devices will be rendered perfectly on them. People will find it easy to navigate such interfaces and they will spend more time on them. This will reduce the bounce rate of the website and will have a positive effect on the conversion rate as well.
2. Improved SEO Prospects
The biggest impact that AMP has on a website is on its SEO. Faster pages along with valuable content will lead to increased traffic. It also improves the chances of the interface appearing in the carousel visible on top of Google mobile search results. All these factors along with enhanced user experience will improve the online visibility of the interface.
3. Reduced Load On Server
The implementation of the technique on a website will also reduce the load on its hosting server. As Google’s optimization features are in-built in the project, it decreases the bandwidth usage by resource-heavy elements like images. This improves the server-side rendering of items which are displayed to the end-user in an optimized manner. The reduced server load boosts the performance of the website.
What Are The Disadvantages Of Using AMP?
People looking to set up Google AMP on WordPress must also know about the potential drawbacks of the practice.
1. Limitations In Adding New Features
AMP uses limited HTML, JavaScript, and CSS to create fast-loading versions of your pages. This means that elements such as animations and high-definition graphics, which use these scripts may not work on the interface. This can restrict your ability to add new features or widgets which contain such elements. Items which use dynamic scripts such as smart e-mail marketing forms will not work properly on such pages.
2. Restricted Advertising Opportunities
Another serious drawback that can deter many users from leveraging the initiative is limited advertising opportunities. The project does allow adverts in the page content but adding them is a complex process. Integration with external ad platforms is also limited. Many people convert HTML to WordPress or switch formats to acquire a website with enhanced monetization capabilities. These restrictions in earning revenue from displaying advertisements can discourage such users from enabling AMP.
3. Limited Analytics Options
There is no support for any analytics tool except Google Analytics in AMP pages. Google Analytics is undoubtedly a high-quality service providing valuable insight into website traffic. However, many people would like to use other solutions to monitor their visitors and understand their behavior. This rigidity in not allowing other analytics tools can be an issue with webmasters who depend on various solutions to measure their campaigns.
How to Setup Google AMP On WordPress Websites?
It is now time to learn how WordPress users can set up Google AMP on their websites.
1. Install The AMP Plugin
Most tasks in WordPress can be accomplished with a plugin and setting up AMP is no different. Go to the admin dashboard of your installation and select Plugins. Search for the AMP plugin by typing its name in the search box. Install and activate the tool and move to the next step.
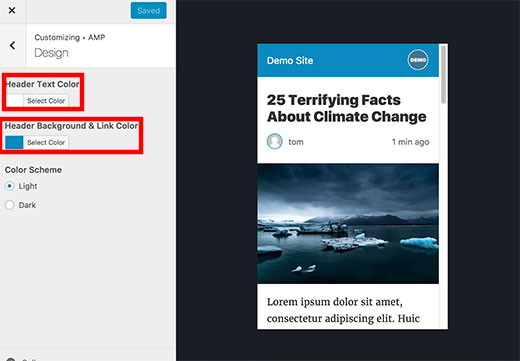
2. Configure The Appearance Settings
The plugin will start working out of the box as soon as it is activated. You can change the look of your pages by configuring the plugin’s appearance settings. Go to Appearance in the dashboard and then click on AMP. this will display a preview of your website’s mobile version. Here, you can alter the color of the header background and text. Save your changes to confirm them.
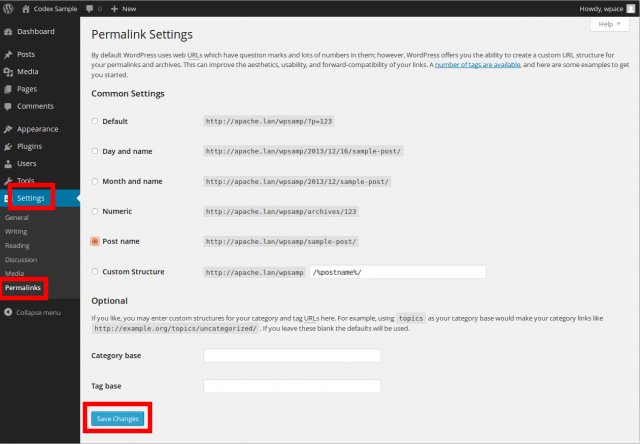
3. Resolving The 404 Error
Add /amp/ to the end of the page URL in the following manner:
https://example.com/2019/09/my-blog-post/amp/
This will display the AMP version of the same page. The 404 error can occur while trying to access the AMP variant. In order to resolve the issue, go to Permalinks in the Settings option of your control panel. Then press the Save Changes button. This will refresh the website’s permalink structure and solve the problem.
Conclusion
You will now be able to set up AMP on your WordPress interface without any trouble. The information will also be helpful to new users who convert website to WordPress and are not familiar with many aspects of the open source platform.