Our Blog
WordPress Plugin Development: How To Uninstall A Plugin

One of the most beneficial features of WordPress web development is the facility of plugins for extending the functionality of a website. Word Press plugin development has over the years has evolved into a separate field and a user can find one or more plugins that will help him/her add a desired feature to the interface. A website owner may need to remove a few plugins after some years for various reasons and while the process is fairly simple, there may be cases in which a plugin may have stored information in multiple locations and in absence of an uninstall script will require manual removal of these files. In this blog, complete information about how to properly uninstall a plugin is being presented for the benefit of amateurs as well as specialists such as WordPress plugin developers.
What Is The Difference Between Deactivation And Uninstallation Of A Plugin?
Custom WordPress plugin development has ensured that there is one available for every conceivable functionality but with the passage of times, some of them may lose their utility for the website necessitating their uninstallation as not doing so will result in bloating of the database. Most amateur users confuse uninstallation with deactivation and therefore must understand the difference between the two. Deactivation is a very simple process and the user has to access the admin dashboard of WordPress and select the “Deactivate” option visible under the name of the plugin.
Deactivating can be helpful in debugging and as the settings and configurations are still intact, must be used when the owner intends to re-activate the plugin in future. In case, there is no such intention to use the plugin again, then it must be completely uninstalled. This is beneficial in cleaning up all the unnecessary files of the plugin from the WordPress database and for this reason uninstallation is always preferable to deactivation.
Uninstallation Of A Plugin
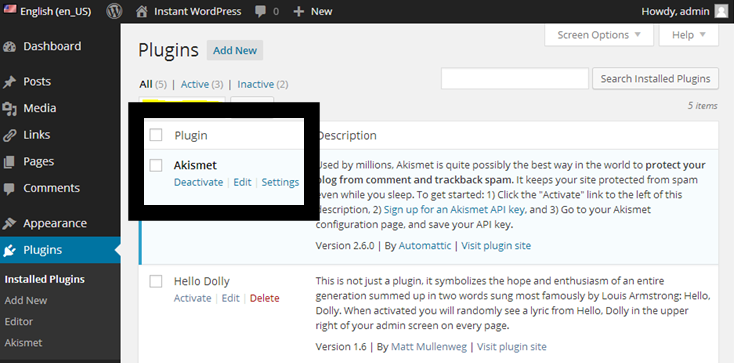
A WordPress user can very easily uninstall a plugin through the admin dashboard of the CMS by logging on to it and accessing the “Plugins” page.
Once the plugin is deactivated, three options can be seen below its name in the admin dashboard, namely- “Activate”, “Edit” and “Delete”. The “Delete” button must be clicked for uninstalling the plugin which will generate the following message asking the user to confirm the action :
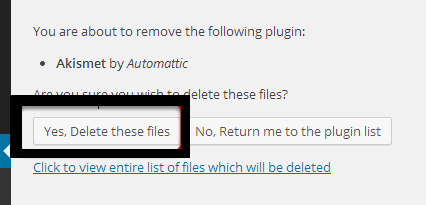
The plugin will be uninstalled once the action is confirmed by the user. Most of the time this procedure is sufficient for the procedure of uninstallation of a WordPress plugins but sometimes it becomes essential to take some necessary actions to remove the extra files that may be stored in different locations. The following steps will help in doing the needful and removing all traces of a plugin from the WordPress database.
Removal Of Additional Files Stored By Plugins
Any expert working the field of WordPress plugin development will be aware of how sometimes plugins create and store files outside their folder which are not deleted even after the plugin has been uninstalled from the admin dashboard. Checking for such files is very easy and can be done by using an FTP client to access the wp-content> folder. It has been seen that plugins used for creating a backup of the website or introducing a gallery or image slider usually create and store files in this folder. In case there is no backup of the website saved anywhere, then all the files present in the folder must be saved on the system and then the ones created by the uninstalled plugin must be selected and deleted.
Removal Of Unused Shortcodes
WordPress developers must be aware of shortcodes which are condensed code helping programmers in embed files or create objects that otherwise needed a lot of complex coding. As soon as the plugin is deactivated or uninstalled, these shortcodes will become visible in the posts ruining the appearance of the website, in this fashion :
[xyzshortcode]
The issue can be solved by adding the following line of code to the functions.php file of the theme being used by the website :
add_shortcode( ‘xyzshortcode’, ‘__return_false’ );
In this instance, we have used a generic term “xyzshortcode” which must be replaced by the shortcode of the plugin that is being removed from the website. This code adds the shortcode back which forces it to display nothing. Keep in mind that if the plugin is installed again, then this code to enable it to function properly.
Cleansing The WordPress Database
As mentioned earlier, some plugins create their tables in the WordPress database and if their file size is quite large then they would bloat the WordPress backup. These tables can be removed through the phpMyadmin but the user performing this action must possess technical knowledge and make sure that the complete backup of the website is stored in a safe place. phpMyadmin can be accessed through the cPanel which is provided by all major web hosting service provider. Once logged on the cPanel with the correct username and password, the user can find phpMyadmin in the database section. Clicking the icon will open phpMyadmin after which the database can be opened to see the list of all tables.
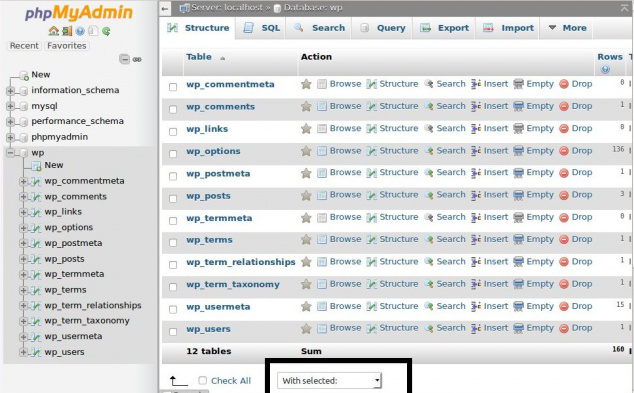
Select all the tables that need to be deleted and then locate the “With selected” drop-down menu at the bottom of the page and choose the option of “Drop” from it to remove all the tables after clicking on the “Yes” option in the confirmatory message.
Conclusion
WordPress plugin development is one of the biggest conveniences offered by the open-source platform but users must possess complete information about the process of plugins removals also. People who want expert assistance in the matter can call +1.415.548.6170 and request a quote.